Developer guide
Contributing
Check out this simple guide for using git.
Create a new branch for your contributions.
Commit your changes in this branch.
Open a pull request to merge changes from your branch into the repository’s
developbranch.
Documentation
Documentation for this project is created using Sphinx and is hosted at Read the Docs (https://ecodata-animate.readthedocs.io/). The source files
for these pages are located in the docs folder of the repository. To edit the documentation, edit the markdown files in this folder (or sub-folders). Note that the docs/index.md file specifies the contents for the docs site. If a sub-folder has a index.md file, that file specifies the contents for that section of the docs site (e.g. docs/user_guide/index.md). If files are added or removed, the corresponsing index files will also need to be updated.
Building the docs
After editing the pages, you can look at a build of the pages to see how things will actually look in the docs website. There are two options for this:
Option 1: Open a pull request, and Read the Docs will build a preview of the docs pages. A link to the build can be found near the bottom of the page of the PR, in the merge checks section. You may have to click “Show details” next to where it says “All checks have passed”. Once the build is finished, click on “Details” for the docs/readthedocs.org:ecodata-animate item:

This will take you to the build for the PR. Once the build is finished, click on the “View docs” link to the right of build info:
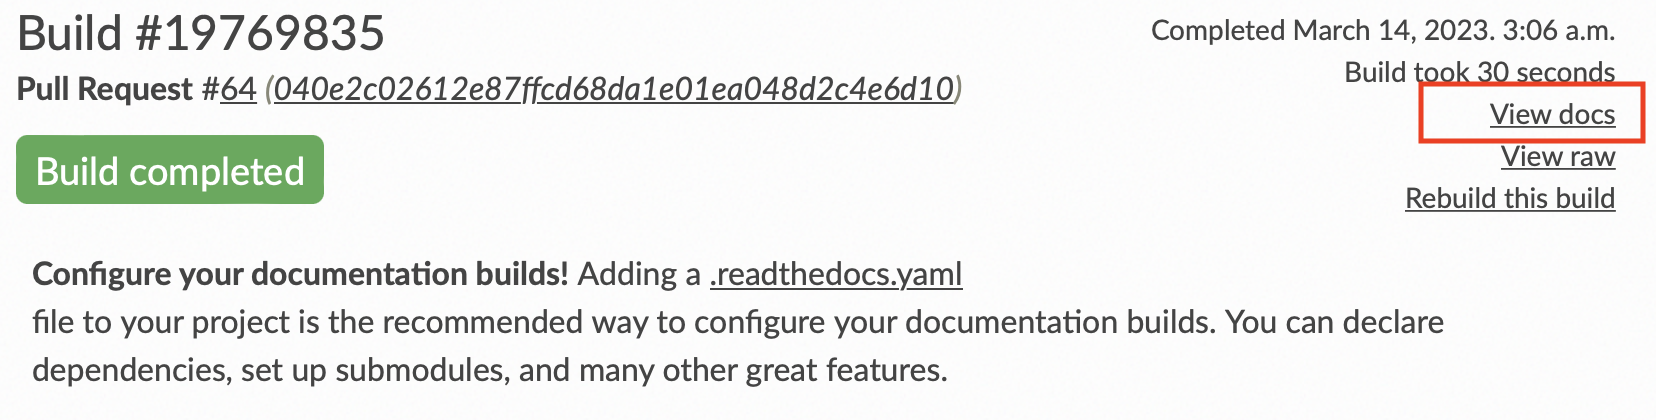
Note that the large green “View docs” button at the top of the page takes you to the current docs page, not the PR build. When viewing the docs build for a PR, you should see a banner at the top of the docs pages that looks like this:

You can push additional commits to the open PR if you want to change anything after seeing the preview build. Read the docs will build a new preview whenever a new commit is made to the PR.
Option 2: Build the docs locally. You will need to have python and the docs requirements installed.
To install the doc requirements:
pip install sphinx furo sphinxcontrib-matlabdomain myst-parser sphinxcontrib-youtubeor install using the conda or pip requirements file (located in thedocsdirectory)Build the docs:
sphinx-build -b html docs docs/_buildTo view the build, open the
index.htmlin the docs/_build directory that was created.
Versions of the docs
Read the Docs builds multiple versions of the documentation (for different branches of the repository). In the bottom corner of the docs pages, there is a box indicating which version you are viewing. You can click on that box to pick a different version.
Setup instructions for the MATLAB code
Adding datasets
Most of the datasets are too large to be stored in the repository
Datasets used in the example scripts can be downloaded here
Copy any datasets you want to use to
data/user_datasets
Adding topo data for the m_map package
Copy the contents of this folder to
m_map/data
Required toolboxes
The mapping toolbox and the MATLAB Compiler need to be installed.
Compiling the app
This process needs to be done on both Mac and Windows, to build installers for both systems.
Make sure the topo dataset has been downloaded and added to the m_map folder! (see above)
Open
apps/animator.mlappEdit “Sharing Details” (this can be found if “animator” is selected in the component browser):
Update the version (major.minor)
Update the description with the release tag
In the main MATLAB window, go to the
Appstab, thenStandalone Application Compiler.You will need to create a Project for the compiler. Create a project in the root directory folder called ecodata-animate.
In the Project window, there should be a Task for the Standalone Desktop App. In the task settings:
Under
Main File, addanimator.mlappChange
Output Locationsto a convenient build location (like somewhere not tracked by git. Just make sure you don’t commit any of the build files)Under Application Info, check that the version is correct (this should have been auto-filled with major.minor from the .mlapp file). The version should be major.minor.bugfix, and the Description box should have the full version tag (e.g., v1.4.0rc1), making sure this corresponds to the release tag on GitHub.
Under
Executable Details, change the Executable Name to ECODATA_AnimateUnder
Files required for Standalone to run, make sure thefunctionsandm_mapfolders are both added!Under
Installer Details, selectFetch MATLAB Runtime from mathworks.com during application installation.Change
Installer Nameto ECODATA_Animate_InstallerClick the
Build and Packagebutton.Make a new folder called
Mac_InstallerorWindows_Installer.From the output folder created by the compiler, copy the file
package/ECODATA_Animate_Installerto the new folder.Compress the folder to a .zip. The two .zip folders (for Mac and Windows) are what need to be uploaded as release assets.